Sunday 16 October 2022

Decorated with Happiness for Global Design Project #364


Hello and welcome to my blog. The Global Design Project challenge really caught my eye this week - it's a CASE the designer challenge using this wonderful inspiration from
Madeleine Mrotzek.


To CASE a design means you copy and selectively edit the design - you take something from the original and make it your own. I rarely use a colour family altogether on one card and I'm not sure that I have ever made a slimline card! My interest was definitely piqued with Madeline's example, and as I'm in Christmas card mode I chose to create a card with the Decorated with Happiness set to make a slimline card using the Brights collection of colours. Hop over to the Global Design Project #364 post and you'll see lots more ideas inspired by Madeline's card.

I began with a pile of inkpads from the Brights family and began stamping one of the baubles from the set on to matching cardstock. Then, I wondered how the baubles would look if they were white heat embossed. Answer? I like the effect!

The Decorated Pine die set includes dies to cut out the baubles and also a selection of stars. So, as I was cutting the baubles out I cut out some of the stars at the same time. Two versions of the same card were forming in my mind...on to the assembly.


For the first card, I began with a Shimmery White card base together with a smaller layer to display the baubles on. I arranged them, without sticking them, so that I could add some stamped details behind them. I used the stamps with the star and dot patterns and added colour according to the position of the coloured baubles. The sprinkled colour breaks up the whiteness of the background. To finish I added Basic Pearls to the centre of the baubles, some of which are raised on dimensionals, and a sentiment from the Spruced Up set. The decorative layer sits on a slightly bigger layer of Bermuda Bay.


The second version uses the white heat embossed baubles. They sit on a layer of Shimmery White card that is slightly bigger than the card base. This time the added decoration is a sprinkling of the die cut stars. Extra detail is added to the stars as they are die cut creating more dimension. Again the colour graduates according to the colour of the baubles, but I added a few Shimmery White stars too! I added the same sentiment from the Spruced Up set, however, this time it is white heat embossed to tie in with the baubles.

I made sure that my cards would fit our Slimline envelopes. I will be making more slimline cards for sure! Thank you for the inspiration Madeleine - I am so pleased with the way these turned out.

If you want to purchase the items used for these cards, or any other supplies, please take a look in my online Stampin' Up! shop. You can follow the link or click on the pictures below of the products I have used today.

Stay safe and as always, happy crafting,


If you would like to order any supplies, and you live in the UK, I would love to be your demonstrator. Use the hostess code
QSUTBVT7 to get some free product (it will follow in the post after the end of the month). If your order is over £150 do not use the code as you become the hostess and get the rewards. To place an order please visit my online shop HERE

If you would like to join my team, you can choose your starter kit HERE and if you have any questions, please contact me at furrycatdesigns@gmail.com

All Star Tutorial Bundles

All Star Tutorial Bundles have 12 AMAZING video tutorials to inspire you each month.


Click HERE for sneak peeks or to purchase.

FREE with a purchase from my online store
 

Click on the images of the products I have used today to purchase them in my online shop:


Saturday 8 October 2022

Stamping Inkspirations Blog Hop - October 2022


Hello and welcome to my blog! Today I am taking part in a blog hop with some fellow enthusiasts who love sharing their creative talents using their Stampin' Up!® products. This month we have Stampers Choice for the Stamping Inkspirations blog hop. Our challenge is to follow a card sketch or make a 3-d item.


I decided to create following the sketch challenge, which turned into quite a challenge. Creative block got the better of me and I ended up with a complete mess on my desk. The first idea in my head didn't work out when I came to stamp it, but it was ok because another spark of an idea came to me. Sadly, that didn't work either. After a few fractious moments I had a moment of clarity and decided that I needed to make things super simple.


I decided to use Designer Series Paper and I also took the executive decision to have clean cuts instead of torn edges. I do love the look of torn edges on other people's cards, but mine never seem to look quite right! 


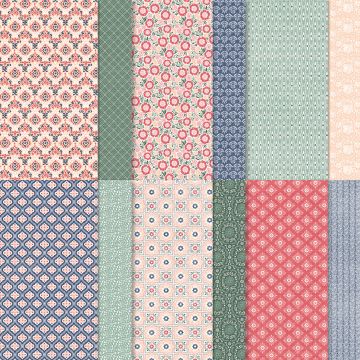
I love all the elements in the The Lovely in Linen Suite. The stamp set has a variety of sentiments which can be used with or without the frame stamp, but the coordinating Lasting Label punch makes it so easy to create a feature of the sentiment. The DSP has patterns that are pastel and pretty, but there are also geometric designs which are suitable for masculine cards.

The DSP strips are adhereded onto a slightly larger layer of Night of Navy and then mounted onto a thick Basic White card base. Using the Stylish Shapes dies I cut banners in these two colours and layered them up under the sentiment label, which adds height without the use of dimensionals. There are also a couple of layers to the sentiment, which wasn't my original intention. However, I am now calling my correction to cover a smudge from my inky fingers a design feature! To finish, I scattered a few InColor Opal Rounds next to the sentiment.


Making this card has had plenty of twists, turns and mistakes. It was a very complicated route to make an uncomplicated card. Having said that, I do like the way it has turned out! I hope that you have been inspired to be creative today and that you will continue along the hop to see what the others have created too. Enjoy the projects. We would love to hear from you and so if you have been inspired, please leave a comment.


Angie McKenzie  ●  AurĂ©lie Fabre  ●  Annette Ball

Tricia Butts  ●  Jan Musselman  ●  Ann Krucek

Sharon Hashimoto Burkert  ●  Mo Rootes   ●  Marieke Bart

Leonie Stuart  ●  Chris Smith  ●  Susan Webster  ●  Karen Henderson 

Vickie Littlewood  ●  Robbie Susan Chandler  ●  Danielle Kassing  ●  Teri West


Do you need any of the products used on today's card? If you live in the UK you can click on the shopping links below to add them to your collection today.

Thank you for joining us today! Looking forward to seeing you next time. 

Stay safe and as always, happy crafting,


If you would like to order any supplies, and you live in the UK, I would love to be your demonstrator.
Please take a look in my online Stampin' Up! shop use the hostess code QSUTBVT7to get some free product (it will follow in the post after the end of the month). If your order is over £150 do not use the code as you become the hostess and get the rewards. You can follow the link or click on the pictures below of the products I have used today.

If you would like to join my team, you can choose your starter kit HERE and if you have any questions, please contact me at furrycatdesigns@gmail.com

All Star Tutorial Bundles

All Star Tutorial Bundles have 12 AMAZING video tutorials to inspire you each month.


Click HERE for sneak peeks or to purchase.

FREE with a purchase from my online store
 

Click on the images of the products I have used today to purchase them in my online shop:


Wednesday 5 October 2022

All Star Tutorial Bundle Blog Hop - Rustic Harvest Suite

Hello and welcome to our All Star Tutorial Bundle Design Team Blog Hop for October 2022. This month we are using the Rustic Harvest Suite. The projects featured in the bundle are exclusive and the tutorials come complete with photos, video directions and a supply list that includes both Metric and Imperial measurements. 


Here is a sneak peek of the Rustic Harvest bundle of tutorials.


To enjoy the tutorials you have several options:

  • shop with me -  if you order from my online store you will receive that month's bundle for free
  • purchase - buy the bundle for £11.50 
  • Join my Team - team members will receive the tutorials for free

Here is a close up of my tutorial project.


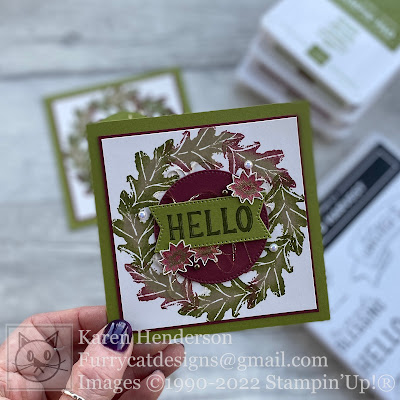
To give you even more inspiration each of us has created another project using the Rustic Harvest Suite of products. Here is my project for today.


With the aid of my Stamperatus I created an Oak leaf wreath. I stamped onto a square piece of Shimmery White card - I really like the creaminess of this card. Basic White was I bit too bright and I didn't want to go too dark with Very Vanilla. The leaves were inked with a solid colour - either Sahara Sand or Old Olive - and then extra colour was added, using a sponge dauber, to add an Autumnal edge. I used Old Olive on top of the Sahara Sand leaves and Merry Merlot over the Old Olive ones. Make sure you clean the stamp between impressions, otherwise you'll end up with a muddy mess of colour!


I used the Fabulous Frames dies to fill in the centre of the wreath and for the banner. The little flowers are heat embossed in gold and then coloured with Merry Merlot ink and the finest of the Water Painters.

I had a spare wreath left over from my practising. So, I decorated it ever so slightly different. This time I gold heat embossed the Hello and just added a few Rustic Metallic dots for decoration. Which one do you prefer?


Let me know what you think in the comments below. If you want to be inspired with more ideas using this suite you can purchase the tutorial bundle (along with previous tutorials) HERE

Thank you so much for visiting today. Click on the names below to hop around and see all the other amazing projects. Enjoy! If you live in the UK you can purchase these products below.

Blog Hop List:

Stay safe and as always happy crafting,


If you would like to order any supplies, and you live in the UK, I would love to be your demonstrator. Use the hostess code
QSUTBVT7 to get some free product (it will follow in the post after the end of the month). If your order is over £150 do not use the code as you become the hostess and get the rewards. To place an order please visit my online shop HERE

If you would like to join my team, you can choose your starter kit HERE and if you have any questions, please contact me at furrycatdesigns@gmail.com

If you want to purchase the items used for these cards, or any other supplies, please take a look in my online Stampin' Up! shop. You can follow the link or click on the pictures below of the products I have used today.

All Star Tutorial Bundles

All Star Tutorial Bundles have 12 AMAZING video tutorials to inspire you each month.


Click HERE for sneak peeks or to purchase.

FREE with a purchase from my online store
 

Click on the images of the products I have used today to purchase them in my online shop: